BBQ Bacon Wrapped Ribs Video
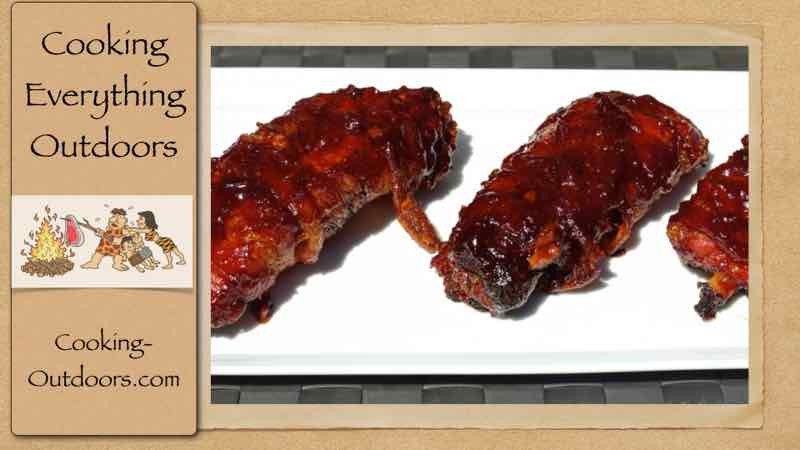
BBQ Bacon Wrapped Ribs in the Camp Chef Big Gas Grill, proving you can BBQ anywhere anytime! Whenever you can combine Bacon, Ribs and BBQ into one delicious meal you have a winning BBQ recipe.
BBQ Bacon Wrapped Ribs Recipe: http://www.cooking-outdoors.com/bbq-bacon-wrapped-ribs.html
Homemade BBQ Sauce Recipe: http://www.cooking-outdoors.com/how-to-make-homemade-bbq-sauce.html
Basic BBQ Rub Recipe: http://www.cooking-outdoors.com/basic-barbecue-rub.html
(Closed Captioning available for this video)
Video Transcript:
Presenter:
Hey, everyone, today I’m going to show you my secret bacon wrapped rib recipe, yup, here on the Cooking Everything Outdoors show.
Shhh, it’s a secret.
Gary House with the outdoor cook Cooking Everything Outdoors show, I hope you try this at home.
So in order to make our secret rib recipe we have to use a few ingredients.
And actually this recipe is quite small and very easy to prepare and will cook in less time than a normal rack of ribs will, which makes it even better for those that are kind of intimidated still about grilling ribs on the barbecue.
They just can’t get them right.
And this is somewhat full proof.
And I think you’d be really surprised how easy all this comes together.
We have several ingredients that we use in this recipe.
So our first main ingredient is a rack of ribs.
And now this is pork ribs and it’s a St. Louis cut which I find works very, very well for this recipe.
You could go with the baby back or you can use a full rack but it’s a little harder to work with and I’ll show you why as we get into this.
I will be wrapping my ribs in bacon.
So any type of medium to thin cut bacon is going to work out really good.
Don’t get that big thick slab stuff.
It tends to be a little too, hmm, not greedy but just too thick on the ribs.
Honey mustard, we’ll use this.
This is a binder for our rub that we made.
And here I have an all-purpose barbecue rub that I just absolutely love on my pork ribs.
And of course, homemade barbecue sauce.
Can’t do without that.
Along with grilling our ribs, very slow low temperature, we’re going to be using smoking chips and I’m going to be using some cherry smoking chips on this recipe.
Now our St. Louis cut of ribs here all I’ve done so far is I’ve washed it and pat it dry.
And it has little bits of extra meat, flaps of flesh.
There’s various names for them but I just don’t want on there right now and it’ll affect my ribs as I’m wrapping them.
So I’m going to trim some of this up.
And it’s not that it’s bad and actually we’re going to throw it on the grill anyway and cook it up but it’s just more than I need on there because I’m looking for uniform, consistent slices out of my ribs.
And here we have this back flap here.
I want to remove that.
It’s optional of course, but I just don’t want it on mine.
And this little back strap, whatever it is, actually makes for pretty good eating once you get that membrane off of there.
And then I want to remove the membrane.
I know a lot of people don’t remove the membrane and in competition cooking and all that it’s absolutely necessary, I prefer to have the membrane off of there.
And I’ve removed it several times in the past videos.
I’m showing you how to do that but just go through it real quick.
The one thing you will need are some paper towels and you’re going to need that to grab that membrane and peel it off.
Now, in order to get this membrane off we’re going to grab it with our paper towels and quite often you can just take this membrane here and just give it a pull and it’ll come right up.
Now if you can’t get a piece of that you can take a butter knife which works really good and you can work that under the skin there to get a hold of some of that membrane.
It’s relatively easy.
Once you get a fairly decent piece pulled back it virtually removes itself.
The whole piece will just virtually come right off.
And it makes pretty quick, pretty quick cleanup on the ribs.
Removing that membrane is going to allow the back of the ribs to be exposed to the rub giving it a little bit of additional flavor, tends to eliminates some of that chewiness you’ll find on the back of ribs.
You’ll find that happens in the restaurants a lot of times when they don’t cook them low and slow, you know, they braze those ribs, they leave the membrane on there and you get this fall apart piece of rib that has that membrane on the back.
It’s kind of chewy like you know a shoe leather tongue.
So it’s kind of nasty.
I like to remove it every time.
Now the secret to preparing this recipe is we’re going to cut the ribs first.
I know that’s completely backwards from what you are used to and what you’ve done in the past.
Usually you cook your whole rack and then you cut them or tear them apart.
But we’re going to do that first.
Now what I’ll do is what they do a lot of times in competition cutting.
And I have this backside up.
The reason I do that is so I can see the ribs a little bit better.
But, you know, you got a rib and then meat, rib and meat, rib and meat.
You know the routine.
So what I’m going to do is I am going to isolate with a sharp knife one of the rib bones.
And we lose a little bit of meat but not a lot.
So I’ve got meat on one side, rib bone on the other.
Then I’m going to go find the other rib bone on the side and I’m going to cut that off.
Trying to save as much meat as possible when I do.
And there I have it.
So there is our riblet with the bone, the meat on both sides to double-cut a rib.
I’m going to do that with every one of these.
So this one I just cut off and I try to go in at a little bit of an angle so that I can work my way around that rib and save as much meat as possible.
I don’t want any of that to going to waste, so you see how I did that, that bone is just virtually isolated.
So I’ve got meat, bone and then I’m going to go on the other side, I’m going to come in at an angle.
Watch your knife, make sure it doesn’t slip and really make sure it is sharp because that’s that only way you’re going to do this.
And I’m going to get these huge chunks of meat, one bone, all meat.
I’m going to do that all the way through and I’m going to reduce this rack about half its normal size.
I’ll have several really nice thick meaty chunks of ribs that we’re going to wrap in bacon.
So here I’ve removed every other bone from the rack of ribs and you can see I’ve got these beautiful super meaty, super fat pieces of riblets.
And we’re going to wrap each one of those in bacon.
That’s going to be our moisturizer as these are grilling.
But before I do that I want to take and put these in a re-sealable bag because it makes a little bit easier to work with.
And then I’m going to apply my honey mustard binder.
And basically all this is, is to help the rub that we’ve made adhere to the ribs.
Doesn’t give off a lot of flavor.
I do find that sometimes I go little bit of a tang to it.
There’s probably maybe 2 tablespoons that I used.
That maybe too much and maybe too less depending on your personal preferences are but that’s what we’re rolling with today.
I’m going to get these all good and coated.
So there, our ribs are coated in the honey mustard.
Smells honey mustardy.
Now I want to take the rib rub.
This is our sweat heat rib rub we’ve made.
And I want to give these a good, good coating.
Maybe good 1/2 cup is going in there.
I don’t want to be shy on that.
And you could do this on the tray that I just carved everything up on.
I don’t like to do it that way but just make sure your rub gets covered all over the surfaces of the ribs.
Now this can go back in the fridge for another couple hours to help maybe bind it a little bit better.
Let some of those flavors melt into the ribs if you want.
I’m not going to do it that long.
I’m actually going to get going on this pretty quick in the time that it takes me to preheat my Camp Chef Big Gas Grill.
And I just have some regular original size bacon here I got a fairly decent price on.
And the flies will leave us alone long enough.
We’ll get these wrapped.
I find about one piece is all you need per rib.
So I have our nicely coated brined and rubbed, so I’ll start with the piece started on the bottom of the rib and I’m going to just wrap it around and I’m going to go around two or three times.
And in this case, this is so big I’m going to need 2 pieces because I don’t want to skimp on the bacon right now.
This beacon is pretty warm.
And that’s what it looks like right there.
So that’s a wrapped rib.
And let’s keep doing that as many slices it takes to get these good and wrapped.
This bacon grease is just going to add to the ribs.
They’re going to keep them moist and tender.
It’s going to eliminate the need for us to foil our ribs during the cook.
And that’s some surprisingly delicious additional taste to our ribs.
So this rack got me 7.
My bacon is cooking in the sun.
I got to get these chill real quick.
Back in the fridge for a few minutes, preheat my Camp Chef Big Gas Grill, cleanup and start cooking.
So the Camp Chef grill is preheated at this point and it’s really, really hot in there.
Let me show you how I have this set up.
So I have only one grate on the side.
And on this side it’s no grate obviously but what I’m going to be doing is putting my smoking chips over here.
In order to do that and to facilitate cleanup I’m going to take a nice chunk of aluminum foil and I’m going to sit it down in here without burning myself.
So I had no heat on this side and my heat is on this side on low.
I’m going to try to get the temperature down on this as low as I possibly can.
So I’m ready to add my ribs now.
And we’re just going to set these on the grate, which is nice and hot, a little bit of sizzle there.
And I’m going to sprinkle a little bit more rub on there.
Now I want to apply my chips.
Now these are cherry smoking chips from Best of the West.
And as these crooks those are going to start releasing a bunch of wonderful smoke.
Let’s close this up and start our cooking process.
Ideally I’m going to be able to keep this under 300, I would love to try to get it around 250 is what I’m shooting for, a little higher than a traditional slow smoke but we’ll see how it goes.
So we’re into this for about an hour now and I’m going to give you a quick peek of how this looks.
So we’re certainly getting some good color and our chips are smoking really well adding that flavor into there.
They are self basting, come on really, really nice.
I’ll close this back up and keep cooking.
Been able to maintain about 250 degrees which is just about ideal for what we’re doing.
So the ribs have been on for about 2 hours and 45 minutes, it’s close to 3 hours now.
And they’re coming up to tempt about where I want them to be.
We’re looking for about 185-190 with the ribs cut out of a rack.
You do need to temp probe them and just use an instant-read thermometer on there.
But there’s one thing I did forget to do and with these ribs wrapped in bacon there’s a lot of grease that drips down into the stove and I forgot to show you to put a tray.
What that should have been, I did kind of halfway through, but basically I just put a little aluminum foil tray underneath my ribs so that the grease would catch and drip into that pan and not fill the bottom of my big gas grill here and that’s what had happened.
I get some bacon grease and it drip down there.
And it just kind of pool and I was afraid it was going to catch on fire, so I changed out my foil and my chips and clean that up and put aluminum catch pan under there and that worked out just great.
The chips are still smoking so I’ve been smoking for about two and a half hours.
And for the last 30-40 minutes I want to start slabbing some sauce on.
And so I have my barbecue sauce, homemade.
And these ribs are just coming along just fantastic.
There bacon is getting crisp here.
And we just want to start adding that other flavor profile to our ribs.
It just doesn’t get better than this.
So we are officially at 3 hours and 15 minutes now.
I’ve cooked them.
I’ve sauced them.
And they are all temping between 180 and 195 on the little ones.
So it’s time to pull them.
Look at that.
That smoke has created this deep rich color in there.
The barbeque sauce has caramelized on there.
And the smell is just absolutely decadent.
So I want to plate these up.
There’s 3.
So there you have it, my secret shhh rib recipe, cooked on the Camp Chef Big Gas Grill with some cherry chips, lot bacon, some good homemade rub and homemade barbecue sauce.
So I really hope you take a chance and throw this on your grill.
I think you are going to be extremely pleased and surprised at how well this cooks.
Lot slower or lot faster than a full rack of ribs, which makes it nice if you are going to pinch for time.
So this is Gary House, me Cooking Everything Outdoors show.
I really hope you enjoyed this.
And please take a second to visit my sponsors, Camp Chef and www.OutdoorCooking.com and www.IslandGrillstone.com.
Without them none of this would be possible.
And I truly appreciate their support and I want you guys to do the same thing.
We’ll talk to you next time but until then you can find me on Facebook, Twitter, Pinterest, www.Cooking-Outdoors.com I think is my website and iTunes and YouTube.
Leave a comment.
Positive ones are greatly appreciated and thumbs up and likes everywhere.
From me and the flies we’ll see you next time.


