How to do a BBQ Grill Fuel Safety check
My old reliable go-to grill gave up the ghost awhile back and a lot of that was from good old fashion neglect. You know, “blinders on” – “it won't happen to me” kind of blissful ignorance that has been the down fall of every BBQ Grill out there.
I'm not saying that I never cleaned the poor old grill … well, it's just I never performed a decent safety check. Year after year of constant cooking can take the toll of any decent BBQ Grill and the toll rang to the tune of a side burner fire – OUCH!
So now I perform a few simple seasonal checks of my BBQ Grill to make sure it is functioning properly. I'll walk you through these few easy steps so you can feel comfortable doing them and after you've done it once, it will be as simple as waking up to the smell of frying bacon (If someone was up before you to cook it)
Step one:
First, disconect any fuel lines, either a propane tank or a natural gas line.
Were going to check: The Manifold area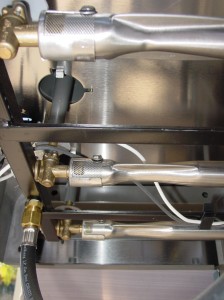
First the manifold area (this includes the side burner assembly). The manifold is basically were the BBQ Grill burner knobs and propane or natural gas lines all come together and meet up with your grill burners (Check your owners manual if your unsure), it's usually a cast brass or stainless steel tube located in the front just under the BBQ Grill box or under the side shelf. If you have a side burner on your BBQ Grill it should be under that or close to it or even in addition to the side burner.
Now once you have located the manifold, look around for anything that may have come loose or may have become dirty. What I mean by dirty is: spider webs, leaves, chunks of food, animal hair, etc. If it's loose – tighten it! If it's dirty – clean it!
Take a small brush and knock off all signs of junk, crud, spider webs, etc. from the manifold area. Use a shop vac to suck anything up or even a air hose from the compressor ….. just get it clean!
This is a huge sorce of BBQ Grill fires.
Step two:
Now it's time to inspect the fuel lines!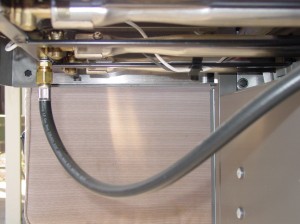
Most BBQ Grills come with rubber supply lines to deliver the propane or natural gas from the tank to the manifold and from there to the burners. These rubber lines can become brittle with age and neglect. It is easy to over look these lines because …. well, they've always worked just fine in the past. “Blinders on”!
Cracked lines are hard to spot, so we are going to be doing a hands on inspection. Starting with the tank you need to grasp each line and feel if it is hard, brittle or deteriorating. This is easy to recognise; the line will be hard to bend, it might crack when you try to bend it or you'll get a hand full of rubber residue when you grab the hose. Rubber fuel lines are flexible and resilient, they should bend easily and then return to their natural shape.
If you expenrience any of the above … the only safe thing to do is replace them ASAP!
Step three:
Just like any gas line in your house, a leak can be catastrophic! Exploding propane tanks are like rockets and you don't need one in your back yard. Just because you can't smell the gas doesn't mean it isn't leaking.
First you need to get a squirt bottle, put a cup or two of water in it and then add some dish soap. How much dish soap? Maybe a half dozen drops is all. Now before you turn on your gas supply or propane tank you'll want to check to see if it is leaking at the source first.
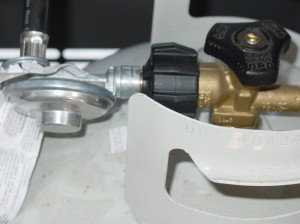
Take your spray bottle and give the valve a few squirts right around the handle and where the BBQ Grill hose connects to it. What we are looking for here are bubbles. If you see bubbles being formed after you spray then you have a leak!
Do not light the grill until it is fixed!! No arguments!! That goes for any leaks you may find!!
Now if there are no leaks, turn the valve on and squirt the hose conection including the regulator (you can see this in the picture above – round flat housing just after the connection knob). If you find no leaks then proceed up the line at every connection till you have no more hose fittings to check.
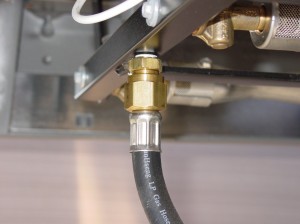 If you do have a leaking hose you have two options depending on where it is leaking. If it leaks at the connecting point of the hose and the grill/manifold/tee or “y” connector then tighten the connection with a wrench and retest. If it leaks where the fitting is connected to the hose (see silver/brass crimped on fitting in picture) then your only option is to replace the hose and it's fitting. You can't patch it so don't even try it…
Once you have done these three steps you will prevent leaks, gas fires and potential explosions.
Next time will talk about keeping your BBQ Grill box clean and safe followed up with how to put out a BBQ Grill fire. No better way to start the New Year than by being safe!
So remember “Three steps- Three times a year” and you will never be accused of having “Blinders On”
Gary
