Tex Mex Recipes on the Grill Video part 1
Here is my interpretation of Tex Mex grilling!
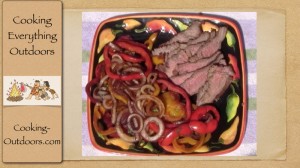
Butterflied Tri-Tip Fajitas, Dutch oven Red Rice and Bacon Re-fried Beans Cooking Everything Outdoors Style!
(Closed Captioning available on this video)
Tex-Mex Recipes part 2 is here: Tex-Mex recipes on the Grill part 2
Tex-Mex Recipes
Butterflied Tri-tip fajitas
2 – 3 lb Tri-Tip, butterflied
1 Lime, sliced
2 c Pineapple juice
2 c Soy Sauce
1 tbs Chili powder
Mexican Red Rice
2 med Tomatoes, chopped
2 tbs Canola oil
1 cup long grain rice
1/2 med onion, chopped
3 Garlic cloves, minced
3 Anaheim chili's
1 1/2 c Chicken stock
2 tsp Sea salt
Re-fried Beans
4 Slices bacon, pieces
1 lrg can Pinto beans, drained
1 c bean broth
salt
pepper
Recipes adapted from the “Tex-Mex Grill and Backyard Barbacoa Cookbook and Fine Cooking Forums”
Video Transcript:
Presenter:
Hey, everyone, this is Gary House.
And today I’m making butterflied tri-tip Mexican red rice and super easy refried beans on the Cooking Everything Outdoors show.
Gary House with the outdoor cook Cooking Everything Outdoors show, I hope you try this at home.
To make our butterflied tri-tip fajitas we need to marinate our tri-tip.
And we also have to butterfly it.
So before I butterflied I’m going to show you the ingredients we’re going to use.
What I have here is a tri-tip.
And this is about 2.5 pounds.
I have one sliced lime.
2 cups of pineapple juice or in this case what I have is a pineapple orange apple blend of 100% juice.
No sugar added.
It’s going to give us that tartness.
2 cups of soy sauce.
And 1 tablespoon of chili powder.
And a 2 gallon plastic re-sealable bag that we’re going to marinate the tri-tip in.
So traditionally, tri-tip has not butterflied.
In fact, the one of the ways that I’ve heard about this is a double butterfly which you butterfly it and then you butterfly it again so that there’s going to be 4 flaps there.
And that’s little bit more than I want to go.
Just create a very thin tri-tip which is a very fast grill.
And that’s why they do that.
So we’re going to take this one.
And we’re just going to butterfly it so that it opens up.
And it’s going to reduce the cooking time.
And it’s going to also present more surface for the marinade to attack to help tenderize and flavor it.
And so just very carefully take a sharp knife and you want to, just like I have shown you with chicken and everything else, just slice that, bookmark.
That’s almost all the way through.
And I have to do half at a time.
Enough there, I’ll flip that over.
Get my mark as close through it as possible.
Don’t worry if it’s not perfect.
If it was perfect then it wouldn’t be fun, right?
And just get it so it looks like that.
And it’s going to lay flat.
And be even consistency.
We need to prepare our marinade and take a… this is a Trigon bag, I didn’t say that earlier.
And put it in a bowl so it stays stable and doesn’t go all over the place.
We’ll add our tri-tip in there.
Our limes.
Chili powder.
Soy sauce.
Smells good already.
And in our case, pineapple orange apple juice.
Get much air out of there as we can.
Seal it up.
Give it a good mix, too.
Get everything coated up.
Into the fridge for 2 hours.
To make are Mexican red rice we’re going to only need a few ingredients.
A couple of medium tomatoes, chopped.
2 tablespoons of canola oil.
1 cup of long grain rice.
1/2 an onion, you can either quarter this and slice it or in my case, what I did was just rough chopped it.
3 cloves of garlic.
3 Anaheim chilies.
1.5 cups of chicken stock.
And a little over maybe 2 teaspoons of sea salt.
We probably are going to use about 1/2 to 3/4 of this.
To get our Mexican red rice dish rolling we need to cook our chilies.
We’re going to char them.
I’m going to seed them.
And then I’m going to chop them up in a dish.
But let’s get a good char these so we can skin them.
It’s simple as preheating your grill.
Throwing them on the grate.
Let them cook for a few minutes.
Flip them again in few minutes.
Flip them again in few minutes until they are essentially just burnt on the outside.
Chilies should be done now.
Flipped them a few times while I was cooking.
And you can see that they’re nicely blackened all the way around.
And what we want to do now is take and drop them into a plastic bag.
Be careful, they are pretty hot.
So putting the chilies in the bag allows them to steam which will help remove the blackened skin and make it easy for us to, at this point, cut them up, seed them and place them up.
So while our chilies are steaming and cooling down here, I want to get the rice, onions, and oil.
Get those started.
And I’m going to use my favorite 10 inch flat bottom Dutch oven.
It’s an antique.
It’s been around for long, long time.
I just want to place this on the grill to start preheating that.
So our Dutch oven has been preheating for a few minutes.
And I’m going to add our canola oil.
And then we want to add our onions and rice.
So what we’re going to do here is while this is cooking, I’m going to be basically sauté the onions and getting the rice to a nice, deep, golden brown color.
It’s going to release those aromatics, that nutty flavor that we look for and some good quality rice.
So we’ll let that cook and probably take about 5 minutes.
So let’s have a go at skinning and seasoning these chilies.
So they’re cooled down enough to where I can handle them.
And the skin comes off extremely easy.
It almost just unwraps, if you will.
Now, if you do have any problems getting this off, you can always…and I’m not…but you can always take a paper towel or dish rag and that will help remove that skin.
And this is just coming off just perfectly.
Just the way I like it.
Let’s finish preparing our chilies.
We want to cut the stem section off.
What I like to do is just give it a slice on one side, open it up, and just scrape those seeds right off.
As simple as that.
Might be a couple of leftovers but no big deal.
Again, just slice the top, slice it open, made out flat, and scrape those seeds right off.
That works with just about any chili.
I like mine a little on a chunky side.
That’s roughly what I’m looking for so that we get a nice bite-sized piece of chili in every mouthful of rice.
Got a couple in there that are little bigger.
Give them a little chop.
If you want them smaller, give them another chop.
It’s not a big deal.
Now that our rice is at a beautiful golden brown I’m going to get my garlic in there.
Just see this, this is just absolutely golden.
Let’s threw this garlic in there now.
Smells incredible.
There’s aromatics going here.
Couple of minutes and we’re ready to add the rest of it.
Our garlic has been simmering.
They are sautéing.
And now we want to add the rest of our ingredients.
So I want to get my chilies in here.
My tomatoes.
Chicken Broth, 1.5 cups.
That’s homemade chicken stock by the way, the only way to roll.
Give this a stir.
I’m going to take a quick taste to make sure…we need to salt and yes, we do, a couple of pinches in there.
I’m going to cover this back up…excuse me, with the lid.
I’m going to bring this up to a boil and then I’m going to drop it quickly down to a simmer.
So I got the rice up to boil.
And now we are at a simmer.
And the juices are really starting to be absorbed rapidly.
And probably 10-15 minutes tops I’m just going to cook this down until obviously the chicken stock has been absorbed.
That’s the word I was looking for.
Such a big word, absorbed.
And then I’m going to take it off and we’re going to let it rest for another 10 minutes or so, and it’s going to be ready to go.
Alright, so about 10 minutes have gone by, take a look at our rice.
Oh the smell.
Okay, that looks absorbed.
I think we’re where we need to be.
Let’s give this a quick stir in it.
Little bit longer but you can see the color in this, flavors.
Going to be just incredible.
I’m going to give that just a few more minutes.
Oh yes.
Yes, yes, yes, yes.
That is beautiful fluffy rice.
Now, what I want to do is get it off the heat now to get quick taste.
They’re seasoning.
And that garlic is just permeating this.
You could salt it up from there if you want.
But I’m going to take it off the heat.
We’re going to let it sit for 10 or 15 minutes there.
Delish.
Hey, I hope you enjoyed this episode of the Cooking Everything Outdoors show.
But without my sponsors, none of this would be possible, Camp Chef and www.OutdoorCooking.com and Island Grillstone at www.IslandGrillstone.com.
Two great companies with really fantastic products.
Go visit them.
Go say hi and go buy something.
If you want to find out more about me, you can find me on Pinterest, Facebook, Twitter, YouTube, iTunes and of course, www.Cooking-Outdoors.com where I’m always coming up with something crazy and new.
This is Gary House.
And I will see you when I see you.