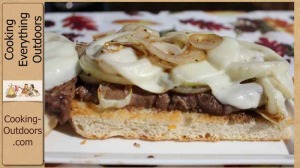

Island Grillstone Open Faced Rib Eye Sandwich
(Closed Captioning available on this video)
Video transcript:
Presenter:
Today in the Cooking Everything Outdoor show we’re making the Island Grillstone winning recipe, open faced rib eye sandwiches with grilled onions and melted provolone cheese.
You’re going to love this.
Announcer:
Gary House with the outdoor cook Cooking Everything Outdoors show, I hope you try this at home.
Presenter:
Now this is an original recipe submitted by Richard Rollins, I’m going to make sure I give him credit for open faced rib eye sandwiches.
His original recipe was absolutely fantastic, but I’ve made a few changes for the video because I already had his way once and I just thought maybe we’ll just take a look at the techniques that’s really what’s important.
He does take 2 rib eye steaks, he marinated his, I’m not going to marinate mine.
Grilled onions are the same.
The provolone cheese is the same.
But Richard’s recipe called for pumpernickel bread.
You know I bought pumpernickel, I made it that way, and I’m not a pumpernickel bread kind of guy, so what I decided to do is make it with a little different bread.
And let show you all the ingredients we’ve got going here and we’ll start grilling.
Let’s talk about some of the ingredients going into our open faced rib eye sandwich.
Now the first thing was pumpernickel.
Now I changed that because I just didn’t want to have any pumpernickel laying around the house and I decided to go with some focaccia.
Hope I said that right, focaccia bread.
I just love the flavor of it.
I think it’s going to add a nice taste layer to this recipe here.
And I just took one big piece and sliced it in half, put some butter on it.
No problem.
Sweet Vidalia onion sliced into ringlets.
For the rub, and really I’m just going to be using gray sea salt and pepper on this, coarse ground fresh pepper.
The original recipe required you to marinate it in cola and olive oil for 6 hours.
And I thought I would try it a little different, with just a straight rub and see how the flavor profile turns out on that this time.
Of course provolone cheese and then 2 rib eye steaks.
And now this is a pretty thick steak that basically I just cut in half.
Have your butcher do it.
I did it real quick.
And that’s all there is to it.
This recipe is super simple, but it’s very, very flavorful.
Right now I’m preheating up the Island Grillstone in the barbecue.
It’s going to take about 15 minutes to do that.
So, as soon as that’s preheated, we’ll start cooking.
Now if this is your first time using an Island Grillstone, I want to show you how I have it configured up on my grill as it’s preheating here.
It’s really pretty simple.
I have the square Island Grillstone.
I’ve been using this one for over a year now and it’s still just rock solid.
I have it to the left of my grill.
I have all 3 burners on to preheat and they’re on high right now.
Once this thing has been preheating at about 450 degrees for 15 or 20 minutes, then I’m going to start cooking but not before then.
It’s really important that this stone gets hot enough to cook on.
Right at this point in the video one of the cameras went down.
It happens.
I think I got the gist of the whole cooking process.
I think you’re going to be able to see how it works.
Give you some overhead shots, it’s not going to be as pretty that it has been in the past, but I think you’ll get the idea.
Sorry about that and enjoy the rest of the video.
Our Grillstone has been heating now for about good 15 minutes, probably closer to 20.
First thing I’m going to do is I’m going to toast my bread.
I really want to get that out of the way before I start cooking everything else.
This goes really fast this whole cooking process.
So, you know, have your mise en place in place, your onions sliced, your steak ready, I’m going to toast my bread on the Grillstone.
Turned this down a little bit.
I don’t need it on high anymore to cook because I’ve preheated it.
So set your grill about medium.
I’m going to keep all 3 burners on.
I’ve already pre-buttered my focaccia bread.
Just put those right there.
You can hear them sizzling.
They’re starting to cook already.
So we know that’s preheated.
I’m going to season my steaks now.
So my rib eyes I’ve already prepared them.
They’re about a 1/2 inch thick slice.
I didn’t marinate these like Richard’s recipe called for.
I just want to try something a little different, may be keep it a little bit more simple.
This is just coarse ground black pepper and some grey sea salt.
And just going to sprinkle that on it liberally.
Both sides.
And as simple as that.
We’re going to be able to ready to throw these on to our Grillstone in just a second.
I’ve got a little bit of pepper and salt left and I’m just going to add that I think into the onions.
Again, I’m not using any oil on the stone.
I’ve got to check the bread real quick here, see how we’re doing on that.
Because it’s going to toast really fast.
Let’s check our bread.
Nice.
Toasting up, picking up some of the flavor from the Grillstone there and leave that on for just a couple more minutes.
That butter from the bread has added a little bit of seasoning to our Grillstone.
This is going to be perfect for the onions.
Onions are going to cook really fast.
I’m going to slap those rib eyes, yeah, rib eyes on the stone next.
Or I should say right after that.
I think our bread’s done toasting.
Time to pull that off, get these onions, those onions on this stone.
Oh, yeah, love that color.
One of the questions I get when cooking on the Grillstone is lid up or lid down.
It really depends on what you’re cooking.
I find that for most of the time with the Grillstone I’m cooking with the lid down.
But if you have to stir fry, for instance, with onions, then, you know, you’re going to have to open up the lid and close the lid and you’re going to let some of the heat out.
But the nice thing about the Grillstone is that it is radiating heat out because that heat is already radiated in and it’s a cooking surface, so you’re not going to lose that much by opening and closing that lid.
Only a minute here on these onions.
And we’ll start getting translucent here real quick and it’s just how we’re going to want them.
But I tell you the smell-o-vision on this, if you had it, would be to die for.
These onions are really, really smelling good.
Let’s close it up and cook a little bit longer.
Our onions are about halfway through the cooking process and that’s where I want to put on my steak.
Let’s take a look at these.
And they’re looking really good.
They’re starting to get translucent.
I’m getting some color on here.
You can see that looks really nice.
Now you can make these as limp and soggy as you want, traditional grilled onions, or you can leave them with a little bit of a crunch to them, that’s the way I like mine.
So I think that by the time I get done cooking the rib eyes, those onions are going to be just where I want them.
So let’s get those rib eyes on right on the stone.
Got that sizzle fired up already.
Simple as that.
Now these are only 1/2 inch thick.
These are not going to take too long to cook them.
And I want it about medium, maybe just a little bit under, you can go medium rare or raw, whatever you want to do, or you can even do it well done.
But not too long on these bad boys, I’m going to flip them probably in about 2 minutes.
Here’s where it gets really, really fast.
Got to flip the steaks and put the onions on top of the steaks, put our cheese on top of the steaks, I’m going to cook for less than 2 minutes and we’re plating these bad boys.
Yup, that’s where we want it.
Nice color there.
A little bit longer on that one but that’s okay.
Let’s get our onions on here.
They’re already starting to look good.
Pair of tongs would probably be better at this point for getting the onions on but I like a lot of onion.
Okay, a couple of minutes like this.
Put the cheese on.
We’re eating.
2 slices provolone cheese on each rib eye steak.
Start melting and oozing.
Or is it ooze and melt?
I think it’s melts and oozes.
It’s all too technical for me.
Here we go.
Looking good.
I think it’s time to plate.
Let’s do this.
Oh, yeah.
Oh, man, the smell.
Look at that cheese.
Look at the mess I’m making.
There’s 1.
And there’s number 2.
Oh, my Gosh.
A couple of onions left here for decoration.
Got away from me.
It’s hot.
Oh man, oh man.
It’s a beautiful thing.
So that’s how we cook the Island Grillstone open faced rib eye sandwich, courtesy Richard Rowling’s recipe and this is just absolutely phenomenal.
Just recently I had someone say, well, why don’t you eat the food at the end of this?
Really never thought anybody wanted to see me stuff my face, but for that one lucky viewer I’m going to take a bite of this bad boy and lets you know what I think.
So we have a beautiful piece of focaccia nice medium rib eye, mouthful it’s big enough to choke on.
Oh, wow.
That’s really good.
I think the focaccia was a really good choice.
Those onions not limp noodly things, they still have a lot of flavor to them, they’re not oversaturated with oil or anything by any means.
And that rib eye just pops, and some of that provolone gooeyness, can’t go wrong there.
This is really good.
Before I wrap things up I want to thank my sponsors, Island Grillstone and Camp Chef at www.OutodoorCooking.com.
You can find the Cooking Everything Outdoors show on Facebook, on Twitter, on YouTube, on Pinterest and probably a bunch of other places that I’ve already forgot, but don’t forget to stop by www.Cooking-Outdoors.com and sign up for my newsletter.
You get all the recipes, all the videos, all the great stuff that I put up on a regular basis.
And this camera up here is beeping and making all that noise.
But, hey, listen, thanks for visiting me in my outdoor kitchen on the Cooking Everything Outdoors show.
Take care.