Pizzas and the Dutch oven Pizza Ring with Stand from Mr. Dutch Oven
How many ways are there to cook pizza? Well, of course you can run to your local bake-at-home store and pick up a pizza and throw it in your oven. You can get some ready-made pizza dough at the store, throw some ingredients on it, and throw it in the oven. You can make your own pizza dough, throw some ingredients on it, and throw it in the oven. At Cooking-Outdoors, we like to throw it on the grill and I like to use it with my Dutch ovens.
Now, cooking a pizza with the Dutch oven is a little bit of a challenge and here’s the way most people do it:
- Take your Dutch oven lid, turn it upside down, and balance it on a lid stand.
- Put your pizza on top of the lid.
- Turn your pot over and set it on the lid, placing your coals on the top of the bottom of your pot where the legs are.
- Some people are clever and they take a piece of chain, make a coil, and wrap it around the legs to hold the coals in place.
 But the greater challenge is to get that pot off without dumping your ashes on top of the pizza when the pizza is done. So it’s not a very effective method. It can be done but it’s not a great way to go. The other way to bake a pizza is using Parchment paper on the bottom of your Dutch oven and using that to lift your pizza out of the pot. If you are lucky the toppings won’t rush to the center when you lift it out.
So along comes Mr. Dutch Oven aka Robert Murphy from Mr. Dutch Oven who sent me a sample of his Pizza Ring and stand. Wow! I was really impressed when I saw this. The perfect solution to Dutch oven Pizza and you don't even need a Dutch oven, just a couple of Dutch oven lids!
Let’s take a closer look at its best features:

Stand. The stand is made out of rebar and Mr. Dutch Oven has welded it into a circle, about 4 – 5 inches tall. The stand has a bottom outer ring with 3 arms going up to a smaller inner ring at an angle of approximately 45 degrees which gives you lots of room to place your coals in the middle of the stand. This is used to support the first lid.
Ring. Simple welded steel in a 14” diameter circle about 3 inches tall.
Here’s how to cook your pizza using Dutch Oven Pizza Ring:
- Take your lid, turn it upside down, and set it on top of the stand.
- Place your pizza on the first lid, the upside down lid.
-
Place your ring which is approximately three inches tall on top of your upside down bottom lid.
- Take your top lid and right side up you set that on top of the ring so what you have is a mini-pizza oven for Dutch oven cooking.
Now why is this an absolutely perfect system?
Well, first, because it’s very versatile. You can use the stand for a couple of different uses. You can use it for regular Dutch oven stand if you don’t have a camp Dutch oven. You can use it to put your skillet on top of if you have to fry something up, and of course, you use it for your pizza ring.
 With the 14-inch size, you can cook multitude sizes of pizza. I personally never cooked one bigger than 14 inches and I think it would be a challenge to do such a thing. But you can cook a couple of smaller pizzas in there. They don’t have to be round. They could be half round. You can get creative and do a 12-inch or a 10-inch pizza.
The main advantage of this system is the inner pizza ring that goes around the lip of the Dutch oven lid. By placing the top lid approximately three inches from your pizza, you are able to get the heat where you want it. So, there’s not a lot of heat on the bottom and just the right amount of heat on top because it’s just the right distance from your pizza enabling you to get a nice golden crispy crust.
The other advantage is by using the lid in the traditional manner, you are able to take your lid lifter, grab a hold of the lid handle and lift it up without dumping your coals on top of your pizza. This is an extremely clever idea! I have used it several times already and without fail, I have had beautiful looking pizzas! I have even made hors d' oeuvres dish which is a taco meatball ring which I will be sharing with you later on.
This product from Mr. Dutch Oven, the pizza ring with stand is an exceptional addition to my collection! I highly recommend you trying this out. However, you do need two Dutch oven lids and you can not certainly purchase those in other places if you need an extra lid. I have a link here Lodge Lid For Camp Dutch Oven – 14in for you to find some spare Dutch oven lids Based on my recommendations, he is now producing a 12-inch version because the majority of us have a couple of 12-inch Dutch ovens lying around.
The Dutch oven pizza ring as I said comes from Mr. Dutch Oven. He also has an outdoor wok available, cooking table, cowboy coffee set and 3 different cookbooks: Mesilla Valley’s Best Chile Recipes, Cooking with a Discada (the Dutch Oven Wok), and The Basics of Dutch Oven Cooking: Murphy’s Cowboy Cookin’. These are all produced by Mr. Robert Murphy, Mr. Dutch Oven himself. These are all available at http://www.mrdutchoven.com.
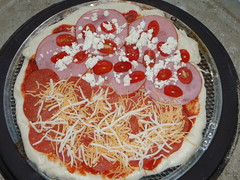
I’m going to be sharing some Dutch oven pizza recipes with you real soon and you can see in the pictures here that we’ve had a couple of successes. I did a half Pepperoni, half Canadian bacon for the family. It was our first attempt and wow, just absolutely perfect!
I made the dough from scratch and here is the recipe for the scratch pizza dough. It is extremely easy. I found this recipe from the book Pizza on the Grill: 100 Feisty Fire-Roasted Recipes for Pizza & More.
 For the pizza dough, you need:
1 cup lukewarm water plus extra as needed
¼ cup of olive oil plus extra for oiling the bowl
1 tsp. of sugar or honey
1 package active dry yeast
3 cups unbleached all-purpose flour plus extra as needed
¼ tsp of kosher salt
Procedure:
Place the oil, water and sugar in a large bowl. Sprinkle the yeast on top and let it sit for about 5 minutes until foamy. In a medium bowl, combine the flour and salt; add to the water mixture, ½ cup at a time, until well incorporated. If the dough is stiff, add more water. If it is very sticky, add extra flour, 1 tsp. at a time, until the dough is soft and slightly sticky. Continue to mix until it feels elastic.
 Turn the dough out onto a well floured surface. Knead for just about one minute until just smooth and easy to work with, adding extra flour to the surface as necessary to prevent the dough from sticking. Do not over work the dough or it will be tough. Place the dough in an oiled, clean bowl. Turn it several times to coat all over with oil, and then drizzle the top of the dough with a little oil. Cover tightly with plastic wrap. Place in a warm spot and let it rest about one hour until it more than doubles in volume.
Punch the dough down and knead on a lightly floured surface for 1-2 minutes until smooth. Divide into 2 equal-sized balls and proceed with your pizza making. The 2 equal-sized balls will get you two 14-inch pizza rounds, perfect for a couple of meals.
I do recommend you try out the Dutch oven pizza ring from Mr. Dutch Oven at http://www.mrdutchoven.com Mr. Murphy is a really nice guy, makes his products himself and is an avid Dutch oven cook. You can't go wrong with that!


I make a lot of pizza and this is yet another way to have pizza using cast iron. I have a cast iron pizza pan that I use in addition to some skookie pans. I will have to try this method on my next camping adventure!